Showing posts with label sewing for sailing. Show all posts

Saturday, May 21, 2011

More canvas work

This photo was taken at Coffs Harbour en route to Queensland (about 3 weeks ago). Here are the lee cloths I made to keep the cockpit warmer and drier while sailing. We were very happy to have these when we did our chilly overnight trip. Once again the sewing isn't pretty as it was a learning curve (with no pattern to work from). The walking foot was a big help in managing the canvas.


Basically, it's a rectangular piece of canvas finished with turnover seams. After the basic rectangle was finished, we inserted plastic grommets which involved punching a suitable hole out of the canvas and then assembling a grommet piece on either side of the fabric and snapping it together.

In between each grommet I sewed a hook through sewable plastic. This was a little frustrating as my machine has a low shank foot and the hook was quite high which mean't I couldn't sew as close to the hook as I would like. Also the needle kept getting caught in the plastic and I had to keep an eye on it otherwise it just pulled out of the machine.

A piece of stretch cord was then threaded through the grommets allowing us to hook the cord around the life lines to secure it on the boat. This has proved a really simple mechanism for fastening the cloths onto the boat but also being able to undo the areas we need to when accessing other boat bits.

Monday, March 21, 2011

Window screens

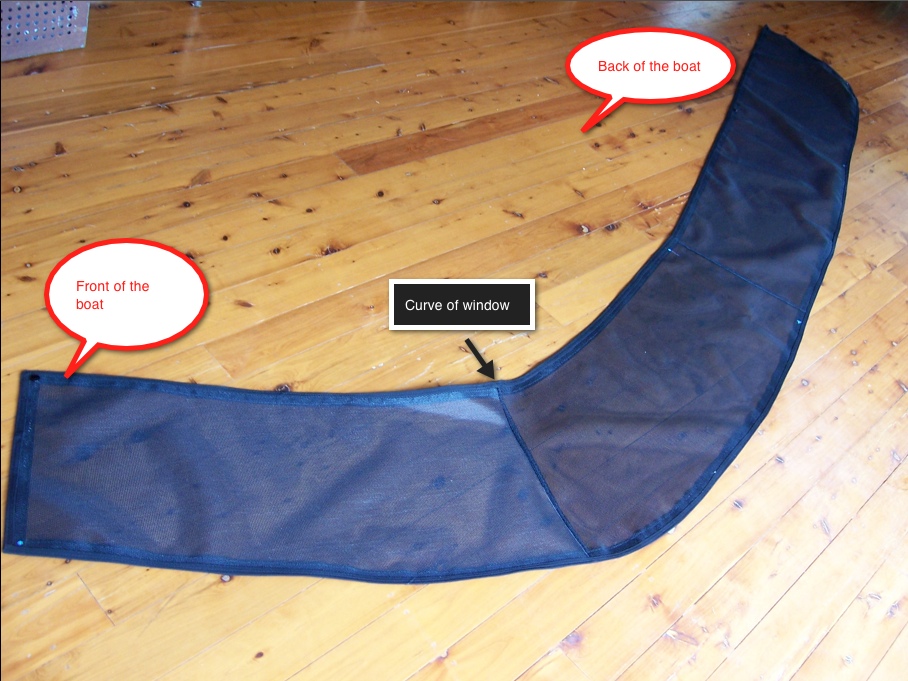
Here's part of what I've been doing for the last few days - not pretty but very practical - window shades for our boat. The boat has large windows around the boat which gives terrific visibility and great light down below but can be hot in summer (see the red outline which is how the screens will be fitted). There is one set of windows on each side of the boat.

As we're planning a trip to the tropics, we thought window shades would be a good idea. So I bought some vinyl black (not blue as it appears in the photo) mesh fabric from Sailrite called Phifertex, which has a number of outdoor uses and provides 70% sunshade but still gives a good view.

I wanted to make them in 2 pieces only, one for each side of the boat, to make them easy to take off and on. So I made a paper pattern and sewed 3 pieces together so it could accommodate the curve of the windows towards the front of the boat. Plus the window sizing wasn't uniform which didn't help.


I ran some black vinyl tape around the edges for strength and finished the edges with black marine grade bias binding. Black snaps were added which will be attached to adhesive sockets on the boat (which means no drilling - hooray).
Front snap

Rear snap
It doesn't look too lovely right now but it will definitely do the job and I'll post a photo once they have been fitted.

Wednesday, March 9, 2011

My new walking foot

I think this could be my new best sewing friend - my walking foot. I bought this recently after making my boat cushions and feeling like I was fighting the canvas when I was machine stitching. I'm also hoping it will help with slippery and other other hard to manage fabrics.


I've only used it briefly on some canvas I'm sewing for the boat lee cloths (more about these later) and have already found it fantastic. It shows in the top stitching....without the walking foot, the length of stitches are irregular and the line of stitching is not too straight. All this is because I'm trying to manage the long length and heavy weight of the fabric while trying to sew straight. Challenging.
Before walking foot - irregular stitches
With walking foot - stitches more regular & straighter
With the walking foot, the stitch lengths and straightness have improved. I also don't feel like I'm fighting the canvas like I was before.

Yes, it's bulkier than a regular foot but I haven't found this a problem and the control more than compensates for this.

I'll report further when I try it on other fabrics. Does anyone else have any tips on this they can share? Are there any other presser feet you can recommend to make sewing easier?

Thursday, February 17, 2011

Boat cushions project complete

From my earlier post, you would have seen I was starting to make cushions for the cockpit to make things more comfy at anchor. Well, I've finished the set of cushions for the seats. For the technically minded, they have been made from Sunbrella marine grade canvas with 'leatherette' piping and zips at the back of the cushions. The foam is mostly dry cell foam to allow water to drain away quickly with a layer of closed cell foam for comfort. There was some wrestling required to get the foam into the covers but this give the cushions a fuller look. 

All materials were sourced from Sailrite in the US, who have a amazing range of materials for canvas projects and sail work. Fulfilment and delivery is very speedy. The also have a great DVD which made this project much easier. 

Must say I'm happy with the result for a beginner cushion maker.

In response to  question about how I did this at home, I've added some further information that may help others. I used a domestic Husqvarna machine (surprisingly) which coped well. I bought a piping foot but it couldn't cope with the thickness of piping, so I ended up using a basic foot for straight sewing and a zipper foot for the piping. If I did it again, I would try using a welting foot and I think a walking foot would be helpful also.

The needles which did a great job were Schmetz 110/18. I also used a thread stand to manage the larger spools of speciality polyester thread for outdoor use.

I purchased very thick T pins and basting tape, both of which I ended up using occasionally only as the materials were reasonably easy to handle.

Finally, the zips were continuous zips (Sailrite #5) with locking zipper pulls. These were installed using the "invisible zip" technique.

Wednesday, February 9, 2011

Boat cushion project

Here's my latest project - cockpit cushions for our boat  - not too sexy but a challenging job none the less. It's taken a while to get to this stage and this is what I had to organise to get started....

1. Create a pattern for the cushions. Nothing sophisticated about this - just paper and tracing on the seats.
2. Identify the most suitable foam, locate a supplier and get the foam cut to shape. There's two type of foam by the way, a dry flow foam for any wet weather and closed cell foam for comfort. These two foam types had to be glued together.
3. Order the materials to make the covers. These were marine quality canvas, continuous zips, pre made piping, under cushion material (non-slip), #18 needles, thread stand for large thread comes and exterior grade, polyester thread. All these materials I sourced from Sailrite who are essential a one stop shop for exterior canvas type projects. They have a great range of exterior canvases should you be making outdoor cushions. Their delivery timeframe is fantastic (at a price). They even have tote bag packs.

So got everything cut yesterday and will start assembly later this week - wish me luck. It will be interesting on my home machine.
Related Posts Plugin for WordPress, Blogger...